One of the “killer applications” in Drupal is the ability to create a custom content type, where a custom content type is
defined as the framework for creating a node. Content types typically have at least a title field, a body field, and several
other fields that areused to capture structured information. An example of a custom content type is an event, where an event
has fields for capturing, storing, and displaying information such as the name of the event, a description of the event (body), the date and time of the event,and the location of the event. Let’s create a new event content type by navigating to Structure -> Content Types and clicking the “Add content type” link on the “Content types” page.
Creating a new content type is relatively simple—enter the appropriatevalues for the name of the content type (in our example
case, the name is Event) and a short description of the content type, and optionally override the label assigned to the title
of the Event node. In the example, I changed the label from just Title to EventTitle (see figure 8-1).

Figure 8-1. Main page for creating a content type
With the “Submission form settings” values defined, the next step is to modify the publishing options to address the specific requirements of your site. Click the “Publishing options” tab and check/uncheck the options that you want to apply to
Events. I’ll uncheck the “Promoted to front page” option, which by default is checked. On the “Display settings” form, I’ll
uncheck the box that triggers author information display when an Event is displayed. Formy requirements, I don’t need to seewho authored an event and when it was published. The “Comment settings” form controls how comments will be displayed for a content type. In the case of an Event, comments aren’t needed. I’ll set the“Default comment setting for new content”
to Hidden. On the “Menu settings” form, I’ll uncheck the “Main menu” check box, as I don’t want content authors to
have the ability to assign Events to menus. I’ll control where Events are displayed by incorporating them into Views on thepages where I want them to appear.
With the content type wide configuration options set, I’m now ready to save the Event content type and proceed with
the next step in the process—adding fields (see figure 8-2). After you click the “Save and add fields” button,
Drupal takes you to the page where you can begin to add new fields to the Event content type.

Figure 8-2. The page for adding fields
Before adding the new fields, we need to decide whether dates will be entered in a plain text field or by using a date field that has features like a pop-up calendar that the author can use to select the date. In most cases, you’ll want to do the
latter, as datesare often used for other purposes, like determining where to place a content item on a calendar, formatting
dates so they display in the user’s local format, or doing date calculations. The Date module (http:// drupal.org/project/
date) provides a field that we can use in our Event content type that includes a pop-up calendar for selecting a date.
So before proceeding with the process of adding our fields, install the Date module following the standard approach for
installing modules.
Adding Fields to a Content Type
The two additional fields for our Event content type are the location of the event and the date/time of the event. I’ll start
with the event location field and will enter Event Location in the label field, event_location in the fieldname field, and I’ll
select text asthe type of data to store using the “Text field” widget (see figure 8-3).

Figure 8-3. Adding the Event Location field to the Event content type
Clicking the Save button reveals the form for setting the maximum length of the Event Location text field. I’ll leave the default value, 255 characters, and will then click the “Save field settings” button. The next form (see Figure 8-4) displays
detailed configuration options for the Event Location field. The next set of values allows you to override the label that wasentered using the form in Figure 8-3, by checking the box that sets the field to required, meaning that the author
must enter a value for this field when creating a new event, setting the physical width of the text field as it appears on the
screen, whether the author will have the ability change the input filter, the help text that will be displayed below the field
on the screen, and the default valueassigned to the field when it is rendered on the form.

Figure 8-4. Field settings for the Event Location field
The last set of values that you can set for the field is the number of values, or cardinality, of the Event Location and the maximum number of characters that the author can enter in the field (see figure 8-5). I’ll leave the default value set to 1,
as an event will likely have only one location, and I’ll leave the maximum length set to 255 characters. Clicking the “Save settings” button returns you to the form shown in Figure 8-3 with Event Location added to the list of fields.

Figure 8-5. Setting the cardinality and maximum number of characters for the field
The next step is to add the field for the Event date. I will follow the same process that I used to create the Event
Location field by entering Event Date and Time as the label and event_date_time as the fieldname, and selecting
Datetime as the type ofdata to store and Text Field with Date Pop-up calendar as the widget that will appear
on the screen. Clicking the Save button reveals the Field Settings page for a date field, as shown in Figure 8-6.
I will leave all of the default settings with the exception of“Time zone handling”—which I’ll set to “No time zone
conversion.” The time entered by the author is the time that I want to have displayed on the site.
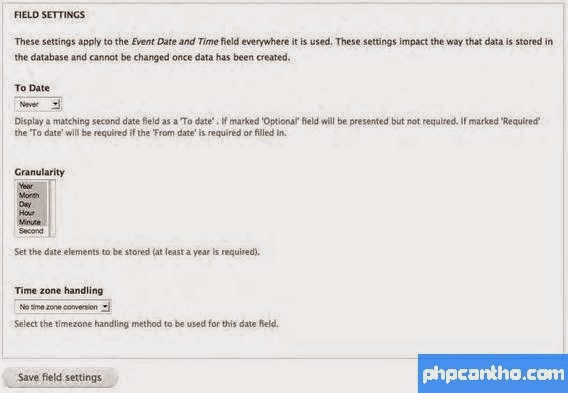
Figure 8-6. The Field Settings page for the Event Date and Time field
After clicking the “Save field settings” button, the Event settings page is displayed for the Event Date field. On this page, I have the ability to override the label that I entered previously, select whether the field is required (date and time are
required foran event for my site), help text that will be displayed below the field, the default display, which is the date
format set in the date module, the default value that will be used if the author doesn’t select a value, the input format that
defines the order and format of the date parts in the input form (e.g., 08/12/2010 – 08:00:00 or 12/08/2010 – 08:00:00 or
Aug 12, 2010 – 08:00:00, etc.), the number of years backward and forward that will display on the pop-up calendar,
and the incremental value for the minute field (if events occur on the hour, every half hour, or every quarter hour, you’ll
likely want to change the increment to 60, 30, or 15 respectively). You also have the ability to set the cardinality or
number of values that can be created—our requirements call for only one value, whether there will be a “from”
and “to” date, the granularity of the date and time, and the ability to override whether Drupal should covert the time
entered when it is displayed based on various options.
For the Event date, I’ll leave all of the values set to their default value and will save the field by clicking the “Save
settings” button. I now have all of the required fields for the Event content type and can begin authoring Events using thenode creation form, as shown in Figure 8-7.

Figure 8-7. Creating a new Event
Creating a Custom Field
Drupal 7 core comes with several generic field types that you can use for a wide variety of purposes. You can use the
predefined field types to capture, store, and display values for a wide variety of purposes, but there may be instances
where the standardfield types (see Table 8-1) just don’t meet your needs.
That’s where the Field API comes into play, enabling the creation of custom field types that can be used in any content
type created on your site.
Table 8-1. Standard Field Types in Drupal 7
Core
|
|
Field type
|
Usage
|
Boolean
|
Used to collect
true/false values
using
check
boxes or radio buttons
|
Decimal
|
Used to collect
numeric values
that include
a decimal point
|
File
|
Provides a
file upload field that allows authors to attach a file to an instance of your content type
|
Float
|
Provides a
text field for capturing numbers that contain decimal points
|
Image
|
Provides an image upload field that allows authors to attach images
to an instance of your content type
|
Integer
|
Provides a
text field that an author can enter an integer value into
|
List, List (numeric), List (text)
|
Provides the ability to create a select list
(drop-down or a list of values to select from) or check boxes/radio buttons that allow a user to select
one or more values from
a number of predefined values
|
Long text
|
Provides a
multi-line text area that authors can enter information into (as opposed to a single
line text box)
|
Long text and summary
|
Provides a
multi-line text area and
a multi-line
summary area where an author can enter information
|
Term reference
|
Provides the ability to select
a taxonomy
term(s)
|
Text
|
A simple text box
|
With the Field API, you have the ability to construct a custom field type for virtually any type of data input that you can think of. As an example, we will use the field type example from Drupal.org (http://api.drupal.org/api/drupal/developer--examples--color_example--color_example.module/7), which defines a custom field that renders text in a color specified in
the field settings for that field type. We’ll use that field type to capture and display the color that event participants should wear whenthey attend an upcoming event. The first step is to create a new directory named color_example in sites/all/
modules/custom. In that directory, create a new file named color_example.info and place the following content into the
.info file.
name = Color Example
description = "Creates a custom field for inputting and displaying text in a colorful fashion."
package = Pro Drupal Development core = 7.x
files[] = color_example.module
php = 5.2
Next create another file named color_example.module and place the following content into that file.
<?php
/**
* @file
* An example field using the Field API.
*
*/
Save the files and enable the module. We are now ready to construct the details of the new RGB field type. The first step is to call hook_field_info(), which defines the basic attributes of our new field. We define the field as color_example_rgb() and
assign a label, description, default widget, and default formatter to the new field type.
/**
* Implements hook_field_info().
*
* Provides the description of the field.
*/
function color_example_field_info() { return array('color_example_rgb' => array('label' => t('Example Color RGB'),
'description' => t('Demonstrates a field composed of an RGB color.'), 'default_widget' => 'color_example_3text',
'default_formatter' => 'color_example_simple_text',),);
}
The next step is to define how the data collected in the field will be stored in the Drupal database. Prior to Drupal 7 and the
Field API, we would have had to define the tables and schema ourselves in the modules that defined our content type and the
custom fields within that content type. In Drupal 7 with the Field API, that task is handled for us through hook_field_schema().
For our example, we’ll store a seven-character field that represents the HTML hex color code that we want to use to render
the text on the screen—for example, using #FF0000 renders the text in red. In the example here, we create a single column
that stores the RGB value entered by the site administrator when he or she assigns the field to a content type.
/**
* Implements hook_field_schema().
*/
function color_example_field_schema($field) {
$columns = array('rgb' => array('type' => 'varchar', 'length' => 7, 'not null' => FALSE),);$indexes = array('rgb' =>
array('rgb'),);
return array('columns' => $columns, 'indexes' => $indexes,);}
The next step is to validate the user’s input by using hook_field_validate(). I’ll tell Drupal to validate that the user entered a
value that matches a pattern of a typical HTML color code using preg_match(). I’ll check to see that the first character is a # and
the following six characters are either a numeric digit or an alpha character that is between “a” and “f.” If the value entered doesn’t match that pattern, I’ll display an error.
/**
* Implements hook_field_validate().
*
* Verifies that the RGB field as combined is valid
* (6 hex digits with a # at the beginning).
*/
function color_example_field_validate($entity_type, $entity, $field, $instance, $lang code,$items, &$errors)
{
foreach($items as $delta => $item) { if(!empty($item['rgb'])) {
if(! preg_match('@^#[0-9a-f]{6}$@', $item['rgb'])) {
$errors[$field['field_name']][$langcode][$delta][] = array( 'error' => 'color_example_invalid',
'message' => t('Color must be in the HTML format #abcdef.'),);}}}}
The next function defines what constitutes an empty field of this type. In this case, we use the PHP empty function to return
either true or false depending on whether the field is empty.
/**
* Implements hook_field_is_empty().
*/
function color_example_field_is_empty($item, $field) { return empty($item['rgb']);}
1. Field formatters are functions that define how the contents of a field are displayed. The hook_field_formatter_info() function identifies the types of formatters that are used to display the text and background in our example.
/**
* Implements hook_field_formatter_info().
*/
function color_example_field_formatter_info() { return array(
// This formatter just displays the hex value in the color indicated. 'color_example_simple_text' => array('label' =>
t('Simple text-based formatter'), 'field types' => array('color_example_rgb'),),
// This formatter changes the background color of the content region.'color_example_color_background' => array
('label' => t('Change the background of the output text'), 'field types' => array('color_example_rgb'),),);}
Next I’ll build the renderable output for each of the two formatters just defined:
1. color_example_simple_text just outputs markup indicating the color that was entered and uses an inline style to set the text color to that value.
2. color_example_color_background does the same but also changes the background color of div.region-content.
/**
* Implements hook_field_formatter_view().
*/
function color_example_field_formatter_view($entity_type, $entity, $field,$instance, $langcode, $items, $display) {
$element = array();switch ($display['type']) {
// This formatter simply outputs the field as text and with a color.
case 'color_example_simple_text': foreach ($items as $delta => $item) {
$element[$delta]['#markup'] = '<p style="color: ' . $item['rgb']. '">'. t('The color for this event is @code', array('@code' => $item['rgb'])). '</p>';} break;
// This formatter adds css to the page changing the '.region-content' area's
// background color. If there are many fields, the last one will win.
case 'color_example_color_background': foreach ($items as $delta => $item) {
drupal_add_css('div.region-content { background-color:' . $item['rgb'].';}', array('type' => 'inline') );
$element[$delta]['#markup'] = '<p>'. t('The color for this event has been changed to @code', array('@code'
=> $item['rgb'])) . '</p>';} break;}
return $element;}
The next set of functions defines the widget that will be used to display the field on the node edit form. For the RGB field, I’ll create three different types of widgets that the site administrator can select from.
1. A simple text-only widget where the user enters the “#ffffff”
2. A three–text field widget that gathers the red, green, and blue values separately
3. A farbtastic color picker widget that chooses the value graphically I’ll use the hook_field_widget_info() function to
define the three widgets.
/**
* Implements hook_field_widget_info().
*/
function color_example_field_widget_info() { return array('color_example_text' => array(
'label' => t('RGB value as #ffffff'),'field types' => array('color_example_rgb'),),'color_example_3text' => array('label' => t('RGB text fields'),'field types' => array('color_example_rgb'),),'color_example_colorpicker' => array( 'label' =>
t('Color Picker'),'field types' => array('color_example_rgb'),),);}
The hook_widget_form() function defines the actual structure of how the widgets will be displayed to the user. Three different forms are provided, for the three widget types.
1. color_example_text provides a text box to enter the HTML color code (e.g., #FFFFFF)
2. color_example_colorpicker – is essentially the same as color_example_text , but color_example_color picker adds a JavaScript color picker helper.
3. color_example_3text displays three text fields, one each for red, green, and blue. However, the field type defines a single text column, rgb, which needs an HTML color code. Define an element validate handler that converts our r,g, and b fields into a
simulated single “rgb” form element.
/**
* Implements hook_field_widget_form().
*/
function color_example_field_widget_form(&$form, &$form_state, $field, $instance,
$lang code, $items, $delta, $element) { $value = isset($items[$delta]['rgb']) ? $items[$delta['rgb'] : ''; $element +=
array( '#delta' => $delta,); $element['rgb'] = array(); switch ($instance['widget'['type']) { case 'color_example_color picker':$element['rgb'] += array('#suffix' => '<div class="field-example-colorpicker"></div>', '#attributes' => array('class' => array('edit-field-example-colorpicker')),'#attached' => array(
// Add Farbtastic color picker.
'library' => array( array('system', 'farbtastic'),),
// Add javascript to trigger the colorpicker.
'js' => array(drupal_get_path('module', 'color_example') .'/color_example.js'),),);
// DELIBERATE fall-through: From here on the color_example_text and
// color_example_colorpicker are exactly the same.
case 'color_example_text':
$element['rgb'] += array('#title' => t('Event\’s RGB Color'), '#type' => 'textfield','#default_value' => $value,
// Allow a slightly larger size than the field length to allow for some
// configurations where all characters won't fit in input field.
'#size' => 7, #maxlength' => 7,); break;
case 'color_example_3text':
// Convert rgb value into r, g, and b for #default_value.
if (isset($items[$delta]['rgb'])) {preg_match_all('@..@', substr($items[$delta]['rgb'], 1), $match);}
else {$match = array(array());}
// A fieldset to hold the three text fields.
$element += array( '#type' => 'fieldset','#element_validate' => array('color_example_3text_validate'),
// The following is set so that the validation function will be able
// to access external value information that otherwise would be
// unavailable. '#delta' => $delta, '#attached' => array('css' => array(drupal_get_path('module', 'color_example') .'/color_
example.css'),),);
// Create a textfield for saturation values for Red, Green, and Blue.
foreach (array('r' => t('Red'), 'g' => t('Green'), 'b' => t('Blue')) as $key=> $title) {
$element[$key] = array( '#type' => 'textfield', '#title' => $title, '#size' => 2,'#default_value' => array_shift($match[0]),
'#attributes' => array('class' => array('rgb-entry')),
// '#description' => t('The 2-digit hexadecimal representation of the
@color saturation, like "a1" or "ff"', array('@color' => $title)),);} break;}
return $element;}
The next function defines the validations that will be performed against the data entered by the user.
/**
* Validate the individual fields and then convert them into a single HTML RGB
* value as text.
*/
function color_example_3text_validate($element, &$form_state) {
$delta = $element['#delta'];
$field = $form_state['field'][$element['#field_name']][$element['#language']]['field'];
$field_name = $field['field_name'];
if (isset($form_state['values'][$field_name][$element['#language']][$delta])) {
$values = $form_state['values'][$field_name][$element['#language']][$delta]; foreach (array('r', 'g', 'b') as $colorfield) {
$val = hexdec($values[$colorfield]);
// If they left any empty, we'll set the value empty and quit.
if (strlen($values[$colorfield]) == 0) { form_set_value($element, array('rgb' => NULL), $form_state); return;
}
// If they gave us anything that's not hex, reject it.
if ( (strlen($values[$colorfield]) != 2) || $val < 0 || $val > 255) { form_error($element[$colorfield], t("Saturation value
must be a 2-digit hexadecimal value between 00 and ff."));}}
$value = sprintf('#%02s%02s%02s', $values['r'], $values['g'], $values['b']); form_set_value($element, array('rgb' =>
$value), $form_state);}}
And lastly I’ll use hook_field_error() to display an error message when the user enters something incorrectly.
/**
* Implements hook_field_error().
*/
function color_example_field_widget_error($element, $error, $form, &$form_state) { switch ($error['error']) {
case 'color_example_invalid': form_error($element, $error['message']); break;}}
The next file to create is the JavaScript file that provides a farbtastic colorpicker for the fancier widget.
Create another file in the module directory named color_example.js and include the following code:
/**
* @file
* Javascript for Color Example.
*/
/**
* Provide a farbtastic colorpicker for the fancier widget.
*/
(function ($) { Drupal.behaviors.color_example_colorpicker = {attach: function(context) {
$(".edit-field-example-colorpicker").live("focus", function(event) { var edit_field = this;
var picker = $(this).closest('tr').find(".field-example-colorpicker");
// Hide all color pickers except this one.
$(".field-example-colorpicker").hide();
$(picker).show();
$.farbtastic(picker, function(color) { edit_field.value = color;}).setColor(edit_field.value);});}}})(jQuery);
The last file required for the color example module is the CSS file. Create a new file named color_example.css and include the
following CSS:
/**
* @file
* CSS for Color Example.
*/
div.form-item table .form-type-textfield, div.form-item table .form-type-textfield * {
display: inline-block;}
After saving the module, the field is ready to add to a content type. I’ll add the color field to Event by navigating to
Structure -> Content Types and clicking the Manage Fields tabfor the Event content type as shown in Figure 8-8.
Figure 8-8. Adding the new Event Color field
After clicking the Save button, I am taken to the next field settings page, which shows that there aren’t any field settings assigned tothe Event Color field (e.g., maximum length). Click the “Save settings” button to display the overall settings page for the Event
(see Figure 8-9). There on this form, I’ll enter the help text I want displayed below the field on the form and the default
color value that will be used when the node edit form is displayed. I’ll click the “Save settings” button to finish the process of
adding the field to the node edit form for Events.

Figure 8-9. Setting the configuration options for the new Event Color field
With the field added to the Event content type, I’m ready to test it out. Navigating to Add content -> Event
reveals the new Event’s RGB Color field on the form with the default value (see Figure 8-10).

Figure 8-10. The new Event RGB Color field on the node edit form
After saving the Event, the new field is displayed formatted as defined in the module’s formatter functions. The image in
Figure 8-11 displays the text in the color defined when the node was created, which in the example I created is red.

Figure 8-11. The new field is displayed in the color defined by the author.
So far I’ve shown you how to use the standard Drupal field types to create a new content type and how to create a field type
that can be added to a content type. Next I’ll show you how to use the Field API to program matically add fields using the FieldAPI in a module.
Adding Fields Programmatically
The Field API can be used to add fields programmatically to a content type or node type. The following example demonstrates using the Field API to add a new field to a content type created through a module. The Job Post module creates a content type that
extends a traditional node (title and body) by adding a new field that stores and displays the name of the company that is sponsor in the job posting. Adding fields takes place in the .install file of a module in the hook_install() or hook_update()functions.
The first step in the hook_install() function adds the body field to our new Job Post content type. By default a content type
created through a module contains only the title field; you must implicitly add the body field. The node.module defines a function named node_add_body_field(), which adds the standard body field to our Job Post content type. The next step that I go throughis adding the definition of all the fields that I want to add to the Job Post content type. In the case of this example, there is a
single field that I’ll add namedjob_post_companies. If I wanted to add multiple fields, I could do so by simply creating additional
field definitions in the _job_post_installed_fields() function. Defining the new field is a simple matter of giving it a name, a label, and field type. The finalstep in creating the field is to instantiate the fields using the field_create_instance() function. This
function does all the behind-the-scenes work of creating the storage mechanism in the database to hold the values entered by the user. When you use this approach, there’s no need to define the tables in the database—the Field API does all the work for you. After you install themodule, the fields are there on the node edit form, ready
for your module to use. For additional information on how to use and theme the output of custom fields, please see Chapter 7.
<?php
/**
* @file
* Install file for Job Post module.
*/
/**
* Implements hook_install().
*
* - Add the body field.
* - Configure the body field.
* - Create the company name field.
*/
function job_post_install() { node_types_rebuild();
$types = node_type_get_types(); node_add_body_field($types['job_post']);
// Load the instance definition for our content type's body.
$body_instance = field_info_instance('node', 'body', 'job_post');
// Add our job_post_list view mode to the body instance display by.
$body_instance['type'] = 'text_summary_or_trimmed';
// Save our changes to the body field instance.
field_update_instance($body_instance);
// Create all the fields we are adding to our content type.
foreach (_job_post_installed_fields() as $field) { field_create_field($field);
}
// Create all the instances for our fields.
foreach (_job_post_installed_instances() as $instance) {
$instance['entity_type'] = 'node';
$instance['bundle'] = 'job_post'; field_create_instance($instance);
}
}
/**
* Return a structured array defining the fields created by this content type.
*/
function _job_post_installed_fields() {
$t = get_t(); return array(
'job_post_company' => array( 'field_name' => 'job_post_company',
'label' => $t('Company posting the job listing'), 'type' => 'text',
),
);
}
/**
* Return a structured array defining the instances for this content type.
*/
function _job_post_installed_instances() {
$t = get_t(); return array(
'job_post_company' => array( 'field_name' => 'job_post_company', 'type' => 'text',
'label' => $t('Company posting the job listing'), 'widget' => array(
'type' => 'text_textfield',
),
'display' => array( job_post_list' => array(
'label' => $t('Company posting the job listing'), 'type' => 'text',
),
),
),
);
}
* Implements hook_uninstall().
*/
function job_post_uninstall() {
// Gather all the example content that might have been created while this
// module was enabled.
$sql = 'SELECT nid FROM {node} n WHERE n.type = :type';
$result = db_query($sql, array(':type' => 'job_post'));
$nids = array();
foreach ($result as $row) {
$nids[] = $row->nid;
}
// Delete all the nodes at once node_delete_multiple($nids);
// Loop over each of the fields defined by this module and delete
// all instances of the field, their data, and the field itself.
foreach (array_keys(_job_post_installed_fields()) as $field) { field_delete_field($field);
}
// Loop over any remaining field instances attached to the job_post
// content type (such as the body field) and delete them individually.
$instances = field_info_instances('node', 'job_post'); foreach ($instances as $instance_name => $instance) {
field_delete_instance($instance);
}
// Delete our content type.
node_type_delete('job_post');
// Purge all field information.
field_purge_batch(1000);
}
Summary
In this chapter, I covered the basics of using Drupal 7’s core functionality to create a custom content type that containsadditional fields beyond the title and body, how to create a custom field type, and how to programmatically add newfields to amodule. In the next chapter, we’ll enter the realm of theming, learning how to apply visual styling to the
content Drupal renders on our site.
content Drupal renders on our site.
Không có nhận xét nào:
Đăng nhận xét